Plack/PSGIとは何か
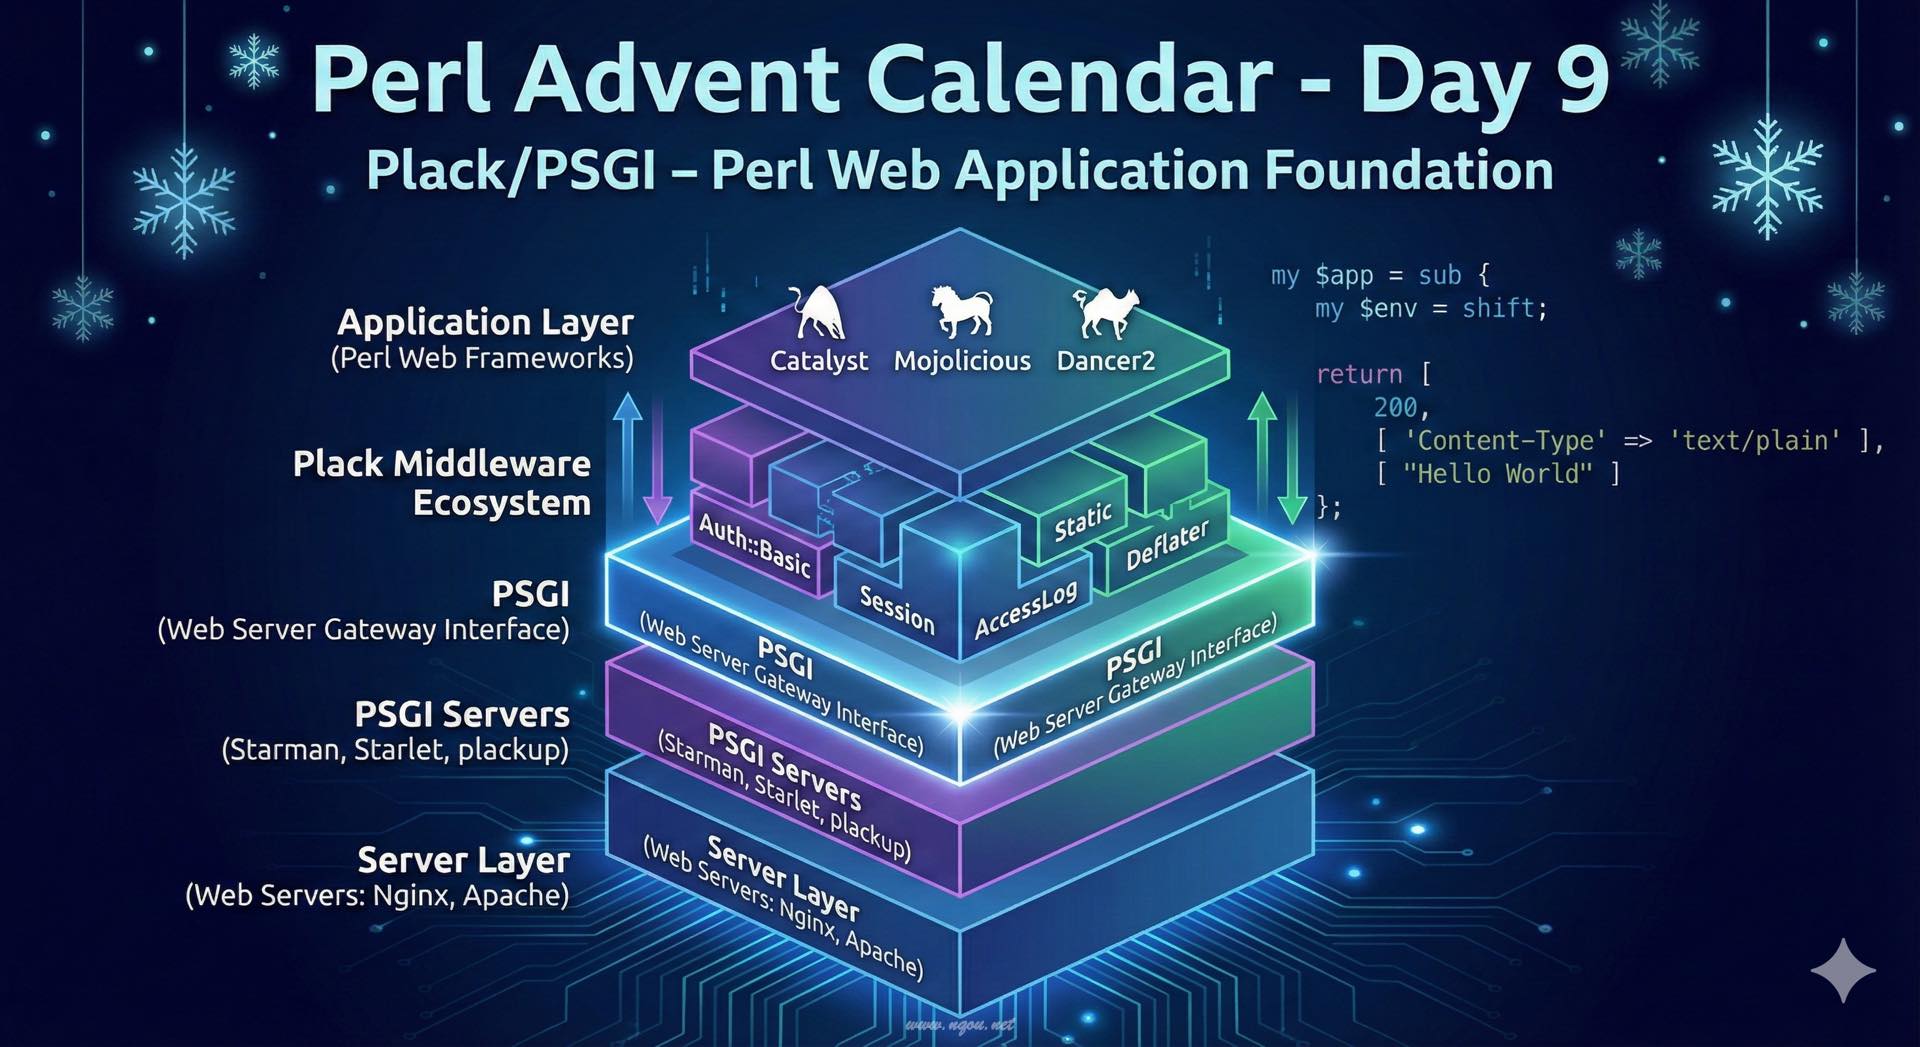
Perl Webアプリケーション開発において、Plack/PSGIは革命的な存在です。2009年に宮川達彦氏によって提案されたPSGI(Perl Web Server Gateway Interface)は、PerlにおけるWebアプリケーションとWebサーバーの間のインターフェース仕様です。そして、Plackはそのリファレンス実装として、PSGIアプリケーションの実行環境とミドルウェアのエコシステムを提供します。
PSGIが解決した問題
PSGIが登場する前のPerl Web開発では、各フレームワーク(Catalyst、CGI::Application等)が独自にWebサーバーとのやり取りを実装していました。これには以下のような問題がありました:
- フレームワーク固有の実装: 各フレームワークがApache mod_perl、FastCGI、CGIなどに個別対応
- デプロイの複雑さ: フレームワークを変更すると、デプロイ方法も変更が必要
- 再利用性の低さ: 認証、ロギング、セッション管理などの共通機能が各フレームワークで個別実装
- テストの困難さ: Webサーバーを起動しないとテストできない場合が多い
PSGIはこれらの問題を、アプリケーション層とサーバー層を分離するという明確な仕様によって解決しました。
PSGIの仕様
PSGIアプリケーションは、非常にシンプルな仕様で定義されます:
 1
 2
 3
 4
 5
 6
 7
 8
 9
10
| # 最小のPSGIアプリケーション
my $app = sub {
my $env = shift; # リクエスト情報を含むハッシュリファレンス
return [
200, # HTTPステータスコード
[ 'Content-Type' => 'text/plain' ], # HTTPヘッダー(配列リファレンス)
[ "Hello World" ], # レスポンスボディ(配列リファレンス)
];
};
|
たったこれだけです!PSGIアプリケーションは、環境変数のハッシュリファレンスを受け取り、3要素の配列リファレンス(ステータス、ヘッダー、ボディ)を返すサブルーチンリファレンスです。
この単純さこそがPSGIの強みです。Python の WSGI、Ruby の Rackに影響を受けた設計思想が、Perl の Web開発に大きな変革をもたらしました。
Plackのインストールと基本的な使い方
インストール
1
2
3
4
5
| # cpanmを使う場合
cpanm Plack
# cpanを使う場合
cpan Plack
|
最初のPSGIアプリケーション - Hello World
hello.psgi という名前でファイルを作成します:
 1
 2
 3
 4
 5
 6
 7
 8
 9
10
| # hello.psgi
my $app = sub {
my $env = shift;
return [
200,
[ 'Content-Type' => 'text/html; charset=UTF-8' ],
[ "<html><body><h1>Hello, Plack!</h1></body></html>" ],
];
};
|
実行は plackup コマンドを使います:
1
2
| plackup hello.psgi
# HTTP::Server::PSGI: Accepting connections at http://0:5000/
|
ブラウザで http://localhost:5000/ にアクセスすると、「Hello, Plack!」が表示されます。
環境変数($env)の活用
$env ハッシュリファレンスには、リクエストに関する豊富な情報が含まれています:
 1
 2
 3
 4
 5
 6
 7
 8
 9
10
11
12
13
14
15
16
17
18
19
20
21
22
23
24
25
26
27
28
| # env_info.psgi
my $app = sub {
my $env = shift;
my $path = $env->{PATH_INFO}; # リクエストパス
my $method = $env->{REQUEST_METHOD}; # HTTPメソッド
my $query = $env->{QUERY_STRING}; # クエリ文字列
my $body = <<"HTML";
<html>
<head><title>環境変数の例</title></head>
<body>
<h1>リクエスト情報</h1>
<ul>
<li>パス: $path</li>
<li>メソッド: $method</li>
<li>クエリ: $query</li>
</ul>
</body>
</html>
HTML
return [
200,
[ 'Content-Type' => 'text/html; charset=UTF-8' ],
[ $body ],
];
};
|
パスによる分岐
 1
 2
 3
 4
 5
 6
 7
 8
 9
10
11
12
13
14
15
16
17
18
19
20
21
22
23
24
25
26
27
| # router.psgi
my $app = sub {
my $env = shift;
my $path = $env->{PATH_INFO};
if ($path eq '/') {
return [
200,
[ 'Content-Type' => 'text/html; charset=UTF-8' ],
[ "<h1>トップページ</h1>" ],
];
}
elsif ($path eq '/about') {
return [
200,
[ 'Content-Type' => 'text/html; charset=UTF-8' ],
[ "<h1>Aboutページ</h1><p>このサイトについて</p>" ],
];
}
else {
return [
404,
[ 'Content-Type' => 'text/html; charset=UTF-8' ],
[ "<h1>404 Not Found</h1>" ],
];
}
};
|
Plackミドルウェア - 機能を積み重ねる
Plackの真の力は、ミドルウェアのエコシステムにあります。ミドルウェアは、PSGIアプリケーションをラップして機能を追加する仕組みです。
ミドルウェアの基本
ミドルウェアは Plack::Builder の builder と enable を使って適用します:
 1
 2
 3
 4
 5
 6
 7
 8
 9
10
11
12
13
14
15
16
| # middleware_basic.psgi
use Plack::Builder;
my $app = sub {
my $env = shift;
return [
200,
[ 'Content-Type' => 'text/plain' ],
[ "Original App Response" ],
];
};
builder {
enable 'AccessLog', format => 'combined'; # アクセスログ
$app;
};
|
便利なミドルウェアの紹介
Plack::Middleware::Static - 静的ファイル配信
 1
 2
 3
 4
 5
 6
 7
 8
 9
10
11
12
13
| # static_files.psgi
use Plack::Builder;
my $app = sub {
return [ 200, [ 'Content-Type' => 'text/html' ], [ "<h1>Dynamic Content</h1>" ] ];
};
builder {
enable 'Static',
path => qr{^/static/}, # /static/で始まるパスを静的ファイルとして扱う
root => './public'; # ドキュメントルート
$app;
};
|
Plack::Middleware::Auth::Basic - Basic認証
 1
 2
 3
 4
 5
 6
 7
 8
 9
10
11
12
13
14
| # auth_basic.psgi
use Plack::Builder;
my $app = sub {
return [ 200, [ 'Content-Type' => 'text/html' ], [ "<h1>Protected Content</h1>" ] ];
};
builder {
enable 'Auth::Basic', authenticator => sub {
my ($username, $password, $env) = @_;
return $username eq 'admin' && $password eq 'secret';
};
$app;
};
|
Plack::Middleware::Session - セッション管理
 1
 2
 3
 4
 5
 6
 7
 8
 9
10
11
12
13
14
15
16
17
18
19
20
21
22
23
24
25
| # session.psgi
use Plack::Builder;
use Plack::Request;
my $app = sub {
my $env = shift;
my $req = Plack::Request->new($env);
my $session = $req->session;
# セッションからカウンターを取得(初回は0)
my $count = $session->{counter} || 0;
$count++;
$session->{counter} = $count;
return [
200,
[ 'Content-Type' => 'text/html; charset=UTF-8' ],
[ "<h1>訪問回数: $count</h1>" ],
];
};
builder {
enable 'Session'; # デフォルトでCookieベースのセッション
$app;
};
|
ミドルウェアの積み重ね
複数のミドルウェアを組み合わせることで、強力なアプリケーションを構築できます:
 1
 2
 3
 4
 5
 6
 7
 8
 9
10
11
12
13
14
15
16
17
18
19
20
21
22
23
24
25
26
27
28
29
30
31
32
33
34
35
36
37
38
39
40
| # combined_middleware.psgi
use Plack::Builder;
use Plack::Request;
my $app = sub {
my $env = shift;
my $req = Plack::Request->new($env);
my $session = $req->session;
my $user = $session->{user} || 'ゲスト';
return [
200,
[ 'Content-Type' => 'text/html; charset=UTF-8' ],
[ "<h1>ようこそ、${user}さん!</h1>" ],
];
};
builder {
# アクセスログ
enable 'AccessLog', format => 'combined';
# 静的ファイル配信
enable 'Static',
path => qr{^/(images|css|js)/},
root => './public';
# セッション管理
enable 'Session',
store => 'File'; # ファイルベースのセッション保存
# エラーページのカスタマイズ
enable 'HTTPExceptions';
# レスポンスの圧縮
enable 'Deflater',
content_type => ['text/css', 'text/html', 'text/javascript', 'application/javascript'];
$app;
};
|
ミドルウェアは上から順に適用され、レスポンスは逆順(下から上)に処理されます。これは、まさに「PSGI アプリケーションをミドルウェアが層状にラップする」という構造です。
実用的なアプリケーション例
Plack::Requestを使った本格的なアプリケーション
Plack::Request と Plack::Response を使うと、より直感的にリクエスト・レスポンスを扱えます:
 1
 2
 3
 4
 5
 6
 7
 8
 9
10
11
12
13
14
15
16
17
18
19
20
21
22
23
24
25
26
27
28
29
30
31
32
33
34
35
36
37
38
39
40
41
42
43
44
45
46
47
48
49
50
51
52
53
54
55
56
57
58
59
60
61
62
63
64
65
66
67
68
69
70
71
72
| # todo_app.psgi
use strict;
use warnings;
use Plack::Builder;
use Plack::Request;
use Plack::Response;
use JSON qw(encode_json decode_json);
# 簡易的なTODOリスト(本来はDBやファイルに保存)
my @todos = (
{ id => 1, title => 'Plackを学ぶ', done => 0 },
{ id => 2, title => 'PSGIアプリを作る', done => 0 },
);
my $next_id = 3;
my $app = sub {
my $env = shift;
my $req = Plack::Request->new($env);
my $res = Plack::Response->new(200);
my $path = $req->path_info;
my $method = $req->method;
# ルーティング
if ($path eq '/' && $method eq 'GET') {
# TODO一覧表示(HTML)
$res->content_type('text/html; charset=UTF-8');
my $html = "<html><head><title>TODO App</title></head><body>";
$html .= "<h1>TODO リスト</h1><ul>";
for my $todo (@todos) {
my $status = $todo->{done} ? '✓' : '○';
$html .= "<li>$status $todo->{title}</li>";
}
$html .= "</ul></body></html>";
$res->body($html);
}
elsif ($path eq '/api/todos' && $method eq 'GET') {
# API: TODO一覧取得(JSON)
$res->content_type('application/json');
$res->body(encode_json(\@todos));
}
elsif ($path eq '/api/todos' && $method eq 'POST') {
# API: TODO追加
my $params = decode_json($req->content);
push @todos, {
id => $next_id++,
title => $params->{title},
done => 0,
};
$res->status(201);
$res->content_type('application/json');
$res->body(encode_json({ success => 1 }));
}
else {
$res->status(404);
$res->content_type('text/plain');
$res->body("Not Found");
}
return $res->finalize;
};
builder {
enable 'AccessLog';
enable 'Static', path => qr{^/static/}, root => './public';
$app;
};
|
テンプレートエンジンの利用
Text::Xslateなどのテンプレートエンジンと組み合わせることで、より保守性の高いアプリケーションになります:
 1
 2
 3
 4
 5
 6
 7
 8
 9
10
11
12
13
14
15
16
17
18
19
20
21
22
23
24
25
26
27
28
29
30
31
32
33
34
35
36
| # template_app.psgi
use strict;
use warnings;
use Plack::Builder;
use Plack::Request;
use Text::Xslate;
my $tx = Text::Xslate->new(
path => ['templates'],
syntax => 'TTerse',
);
my $app = sub {
my $env = shift;
my $req = Plack::Request->new($env);
my $html = $tx->render('index.tx', {
title => 'Plack Template Example',
items => [
{ name => 'Item 1', price => 100 },
{ name => 'Item 2', price => 200 },
{ name => 'Item 3', price => 300 },
],
});
return [
200,
[ 'Content-Type' => 'text/html; charset=UTF-8' ],
[ $html ],
];
};
builder {
enable 'Static', path => qr{^/static/}, root => './public';
$app;
};
|
デプロイと本番運用
開発時は plackup で十分ですが、本番環境では高性能なPSGIサーバーを使用します。
Starlet - シンプルで高速
Starletは、プリフォーク型の高性能HTTPサーバーです:
1
2
3
4
5
| # インストール
cpanm Starlet
# 起動(ワーカープロセス10個)
plackup -s Starlet --max-workers=10 --port=5000 app.psgi
|
Starman - 本番環境向け
Starmanは、より本番環境向けに作られたサーバーです:
1
2
3
4
5
6
7
8
| # インストール
cpanm Starman
# 起動
starman --workers=10 --port=5000 app.psgi
# デーモンとして起動
starman --daemonize --workers=10 --port=5000 app.psgi
|
リバースプロキシ構成
本番環境では、NginxやApacheをリバースプロキシとして前段に置くのが一般的です:
 1
 2
 3
 4
 5
 6
 7
 8
 9
10
11
12
13
14
15
16
17
18
19
20
21
22
| # Nginx設定例
upstream backend {
server 127.0.0.1:5000;
server 127.0.0.1:5001;
}
server {
listen 80;
server_name example.com;
location / {
proxy_pass http://backend;
proxy_set_header Host $host;
proxy_set_header X-Real-IP $remote_addr;
proxy_set_header X-Forwarded-For $proxy_add_x_forwarded_for;
proxy_set_header X-Forwarded-Proto $scheme;
}
location /static/ {
alias /path/to/app/public/;
}
}
|
Systemdでのサービス化
 1
 2
 3
 4
 5
 6
 7
 8
 9
10
11
12
13
14
| # /etc/systemd/system/myapp.service
[Unit]
Description=My Plack Application
After=network.target
[Service]
Type=simple
User=www-data
WorkingDirectory=/path/to/app
ExecStart=/usr/local/bin/starman --workers=10 --port=5000 app.psgi
Restart=always
[Install]
WantedBy=multi-user.target
|
1
2
3
4
| # サービスの有効化と起動
systemctl enable myapp
systemctl start myapp
systemctl status myapp
|
既存フレームワークとの関係
Mojolicious
Mojoliciousは、Plack/PSGIに対応しています:
 1
 2
 3
 4
 5
 6
 7
 8
 9
10
| # Mojoliciousアプリを PSGI として動かす
use Mojolicious::Lite;
get '/' => sub {
my $c = shift;
$c->render(text => 'Hello from Mojo!');
};
# PSGIアプリケーションとして起動
app->start;
|
1
2
| # plackup で起動可能
plackup myapp.pl
|
Dancer2
Dancer2も完全にPSGI準拠です:
1
2
3
4
5
6
7
8
9
| # Dancer2 アプリ
use Dancer2;
get '/' => sub {
return 'Hello from Dancer2!';
};
# PSGIアプリケーションを返す
to_app;
|
1
| plackup -s Starman bin/app.psgi
|
Catalyst
Catalystは初期からPSGIに対応しています:
1
2
| # Catalyst アプリをPSGIで起動
plackup -s Starman myapp.psgi
|
これらのフレームワークはすべてPSGIという共通基盤の上に構築されているため、デプロイ方法やミドルウェアの適用方法は共通です。フレームワークの選択は、アプリケーションの要件や開発者の好みによって自由に行えます。
カスタムミドルウェアの作成
独自のミドルウェアも簡単に作成できます:
 1
 2
 3
 4
 5
 6
 7
 8
 9
10
11
12
13
14
15
16
17
18
19
20
21
22
23
24
25
26
27
| # lib/Plack/Middleware/Timer.pm
package Plack::Middleware::Timer;
use strict;
use warnings;
use parent qw(Plack::Middleware);
use Time::HiRes qw(gettimeofday tv_interval);
sub call {
my ($self, $env) = @_;
my $start = [gettimeofday];
my $res = $self->app->($env);
return $self->response_cb($res, sub {
my $res = shift;
my $elapsed = tv_interval($start);
# レスポンスヘッダーに処理時間を追加
push @{$res->[1]}, 'X-Runtime' => sprintf("%.6f", $elapsed);
warn sprintf("Request processed in %.6f seconds\n", $elapsed);
});
}
1;
|
使用例:
 1
 2
 3
 4
 5
 6
 7
 8
 9
10
11
12
13
| # app_with_timer.psgi
use Plack::Builder;
use lib 'lib';
my $app = sub {
sleep 1; # 処理に時間がかかるシミュレーション
return [ 200, [ 'Content-Type' => 'text/plain' ], [ "Done" ] ];
};
builder {
enable '+Plack::Middleware::Timer'; # + を付けてフルパッケージ名を指定
$app;
};
|
テストの容易さ
PSGIアプリケーションは、Webサーバーを起動せずにテストできます:
 1
 2
 3
 4
 5
 6
 7
 8
 9
10
11
12
13
14
15
16
17
18
19
20
21
| # test.t
use strict;
use warnings;
use Test::More;
use Plack::Test;
use HTTP::Request::Common;
my $app = sub {
my $env = shift;
return [ 200, [ 'Content-Type' => 'text/plain' ], [ "Hello" ] ];
};
test_psgi $app, sub {
my $cb = shift;
my $res = $cb->(GET "/");
is $res->code, 200, 'status is 200';
is $res->content, 'Hello', 'content is Hello';
};
done_testing;
|
Plack::Test を使えば、HTTPリクエストをシミュレートしてアプリケーションをテストできます。これは、Webサーバーの起動が不要で、高速にテストを実行できることを意味します。
まとめ
Plack/PSGIは、Perl Web開発に以下の恩恵をもたらしました:
- 標準化されたインターフェース: アプリとサーバーの分離により、デプロイの選択肢が広がった
- 再利用可能なミドルウェア: 認証、ロギング、セッション管理などを簡単に追加できる
- テストの容易さ: Webサーバー不要でユニットテストが可能
- フレームワーク非依存: Mojolicious、Dancer2、Catalystすべてが同じ基盤を共有
- シンプルな仕様: 学習コストが低く、理解しやすい
PSGIの仕様は非常にシンプルですが、その上に構築されたPlackエコシステムは豊富で強力です。CPAN上には200以上のPlackミドルウェアが存在し、あらゆるニーズに対応できます。
Plack/PSGIを理解することは、モダンなPerl Web開発の基礎を理解することです。小さなスクリプトから大規模なWebアプリケーションまで、Plack/PSGIは常に選択肢に入る、頼れる基盤技術なのです。
参考リンク
Plack/PSGIは、PerlのWeb開発において避けて通れない重要技術です。ぜひ実際に手を動かして、その便利さを体感してください!